
Are you ready for an easy DIY project? Then, this mirror makeover is for you! Here are the steps I took to refresh an old, builder grade mirror in our guest bathroom for under $40. If you prefer a visual, check out this YouTube video: Mirror DIY with Square Mosaic Glass Tiles. All materials can be purchased at your local home improvement store. I was so pleased at how my very first mirror DIY turned out. You will be delighted at what you can do, too!
DIY skill level: EASY!
Items needed:
- glass cleaner $1
- tape measure $1
- small, mosaic tiles $5-12 per sheet
- double-sided/two-side mounting tape $7 -10 per roll
- scissors $1
Approx. total cost: $37
1. Measure the four sides or perimeter of your mirror
- decide how many rows of tile you want to make your frame. (I used 2 rows)
- take those measurements to your local home improvement store to purchase square, mosaic tiles of your choice
2. Select your square, mosaic tile sheet
- lightweight, square tiles with a flat surface adhere tighter and easier
(I used Elida Ceramica Coral Light Uniform Squares Mosaic Glass/Metal/Stone Marble Wall Tile that I got on sale) - use your measurements and number of rows to determine how much tile you will need to create your mirror frame
(the store associate helped me with the math to determine that I needed 2 sheets of mosaic tile according to my measurements)
3. Select your double-sided, mounting tape 
- make sure it is mounting tape that can hold at least 5lbs
(sometimes referred to as two-sided tape) - make sure the tape thickness is adequate for the size of your tiles
(I used .75in tape for 1in tiles) - make sure you have enough tape length for your measurements and row thickness
(I only needed 1 roll of tape in the picture)
4. Clean your mirror thoroughly with glass cleaner
5. Cut the mounting tape to create a frame all around the perimeter of your mirror
- do not remove the front side of the tape until you are ready to put on the tiles
- you can make your frame as thick as you like
(I used 2 rows of tape for my mirror)

6. Layout your tiles
- pull off tiles from the netting and create the pattern you desire before putting the tiles on the tape
(this step is important if you have multi-color tiles that you want to create a special design with on your mirror) - double check to make sure you have enough tiles to complete the mirror frame
- laying out the tiles beforehand makes it easier and quicker to apply
(I learned the hard way)
7. Begin to add tiles to the mirror tape frame
- pull the backing from the tape in a small area
- gently apply each tile one area at a time, then step back to eye your work
(tiles can be re-positioned easier if you do not press hard…I learned the hard way…again) - repeat the process until mirror frame is complete
- press all tiles firmly and securely on mounting tape
SPECIAL NOTE: Most mirrors no longer use mirror clips to secure mirrors. However, if you do have them like me, DO NOT REMOVE. They are necessary although not cute. Your options include tiling around, painting or covering them. I used a Dremel tool to cut a metal tile to cover mine. You can click on this Small Bathroom Renovation DIY YouTube video link (@ 5:22min) to see how this was done.
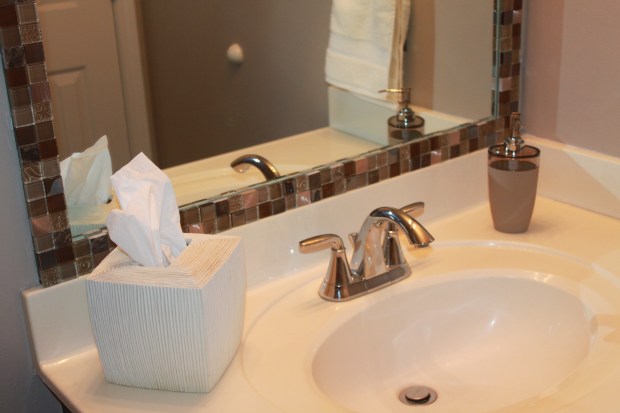
8. Admire your new Mirror DIY!
- clean your mirror and mosaic tile frame with glass cleaner
- pat yourself on the back
- add new bathroom accents to compliment your decor if you’d like
- invite friends and family to share in your DIY joy
If this DIY was helpful, please share this blog post and video with your friends! I would love to hear from you! Please connect with me in the form below.


Thankful always!

Excellent presentation of steps needed for a successful mirror project!